

There is a reason why architecture is among one of the most expensive degrees you’ll encounter.
It is partially (no…it is completely) to do with the equipment you’ll need to make the most of all the skills you’ll be learning. Some things are worth buying and some are not. So here are a list for things to look out for when building the toolkit you’ll need for all the drawing shenanigans you’ll encounter on your course.
1. Pencils - Clutch pencil and mechanical pencils
Having tried both these two types of pencils (yes, they are quite different) my favourite was the clutch pencil.
What is the difference between a clutch pencil and a mechanical?
Clutch pencil is a tool that grips onto a large lead piece. It comes in a variation of lead types for drawing just like your typical pencil except you can change the lead and you can even sharpen it on the release button that lets out the lead piece. What is practical about this pencil is that with a single lead type (2H, HB etc) allows you to vary your line thickness depending, on the amount of contact you placed on the grip of your pencil when drawing. I would stick to to two lead types, on the lead spectrum I chose 2H and 3B (along with the HB lead that comes when you purchase the pencil). Although you don’t have to have two pencil lead types, I would recommend you have variations in your tool kit to give you as much flexibility in producing drawings with the necessary detail and line variation for any given task.
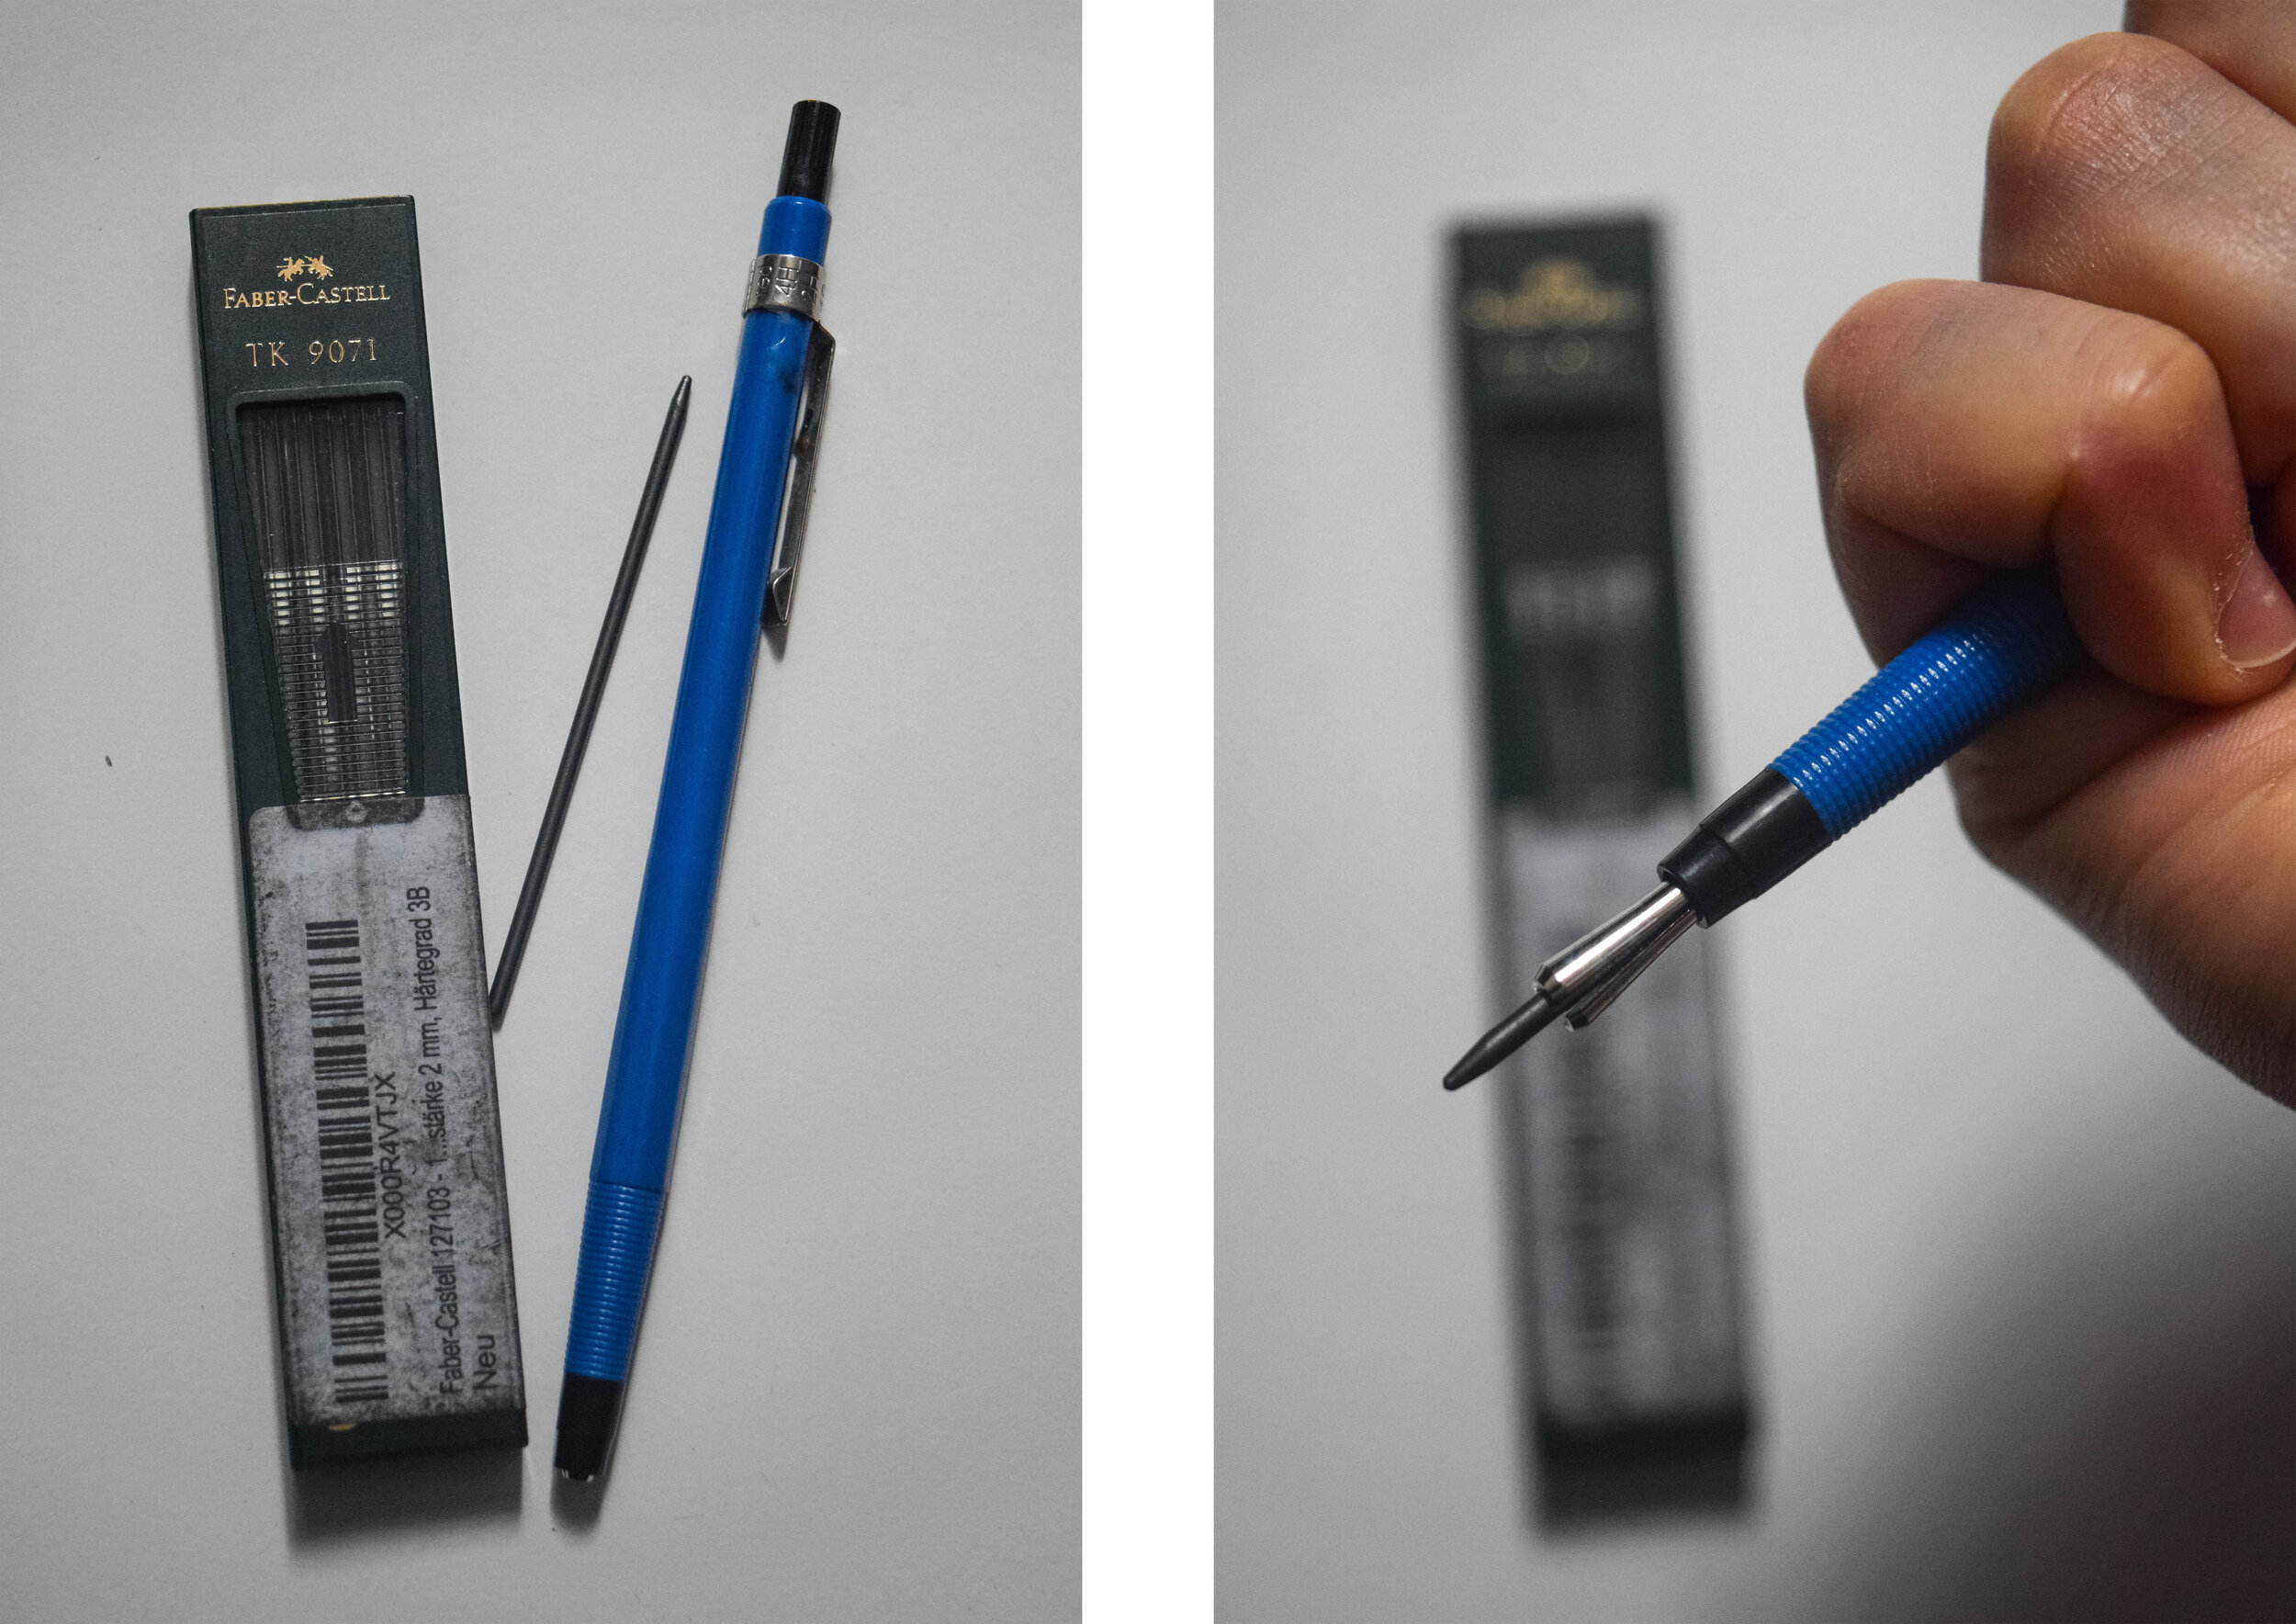
As you can see I have use the Staetdler Mars Technico , and a Faber Castell Lead simply because that is what I could access at the time. Usually the Staetdler Lead is more suited for the Stadtler pencil, as is the Faber Castell pencil. I chose differently.
Mechanical pencils aren’t so bad either. Unlike clutch pencils, each individual pencil comes in a specific lead thickness (0.3 to 0.9 with most pencil brands) not lead types. When the lead runs out, you’ll have to purchase refills. What is super convenient is that in most cases you don’t have to buy the brands refill leads, you can buy refills as long as they are compatible with the lead thickness you are looking for. But if you prefer to stick to its brand refill (and you can afford it), it might be better because after all, it is made for that specific pencil.

Zebra Drafix Mechanical Pencils - 0.3, 0.5, 0.7 all with HB Leads
What stopped me from using these types of pencils was the fact that the 0.3 pencil would always snap and the lead would get stuck. I initially bought the brown Faber Castell 0.3 mechanical pencil (Brown coloured exterior), as everyone would recommend it to me. But slowly, with the trouble of the lead snapping if I wasn’t too careful, it always got stuck and slowed me down in my work. I eventually stopped using the 0.3 altogether. I still do like the feeling of using mechanical pencils, but just be aware that it requires you to be a little more attentive to the pressure you place on it, especially when the lead is as thin as it is at 0.3. If you are a big fan of mechanical pencils, or simple want to try them the ideal lead thickness that makes it suitable for all tasks whether it is note taking or drawing, was the 0.5. I was fortunate to find these at the school supply store within campus, but saw that it is also available online too. It was the mechanical pencil thickness that my tutors would use frequently in tutorials and I was gradually drawn by how multi-purpose just like a regular HB pencil would be. I would recommend the Zebra Drafix mechanical pencils because they weren’t as expensive as the other brands and there was a variation of lead thicknesses to choose from, if you were looking for quality and affordable mechanical pencils.
These pencils may seem fancy but trust me when it comes to technical drawings that you may or may not have to do in first year (and every year after that), you’ll be glad you bought either of these.
2. Sketchbooks - Hardback + Softback, nothing smaller than A5

My Old A4 Ebony Hardback Sketchbook and Cass Art’s A5 Paperback sketchbook (1 of 3 sketchbooks)
Having gone through both hardback and paperback sketchbooks since GCSE Art, (wow that makes me feel so old) it is fair to say that they both have a place in your equipment list. Why you may say?
Honestly, it is a question of personal taste but, I find that hardbacks are practical for study trips and field work. With a sturdy back, there is less risk of ripping or damaging any of the drawings you make when you are out and about. Although, they are more expensive than softback’s, you’ll appreciate the reassurance that you can keep your work safe in your bag.
As for softback’s, you might have guessed they are a little bit on the cheaper. They come in handy for process work, the kind that is messy and for quickly jotting down things as any sketchbook would be good for. If you don’t have a preference, I would stick to A5 when it comes to softback sketchbooks. It seems that the bigger they are, the more they tend to be flimsy and prone to being damaged especially, if you are on the go.

The differences…apart from the colour.
As for size, A5 usually feels a lot more comfortable overall - there is less pressure to fill in blank space when you don’t need to, there is only room for what you want to jot down. But if you use the space up with your drawings feel free to stick to A4. They are both portable sizes (most backpacks are more or less A4 sketchbook friendly) so whichever you choose stay away from spiral bounds unless, your planning to take your drawings out of the sketchbook.
3. Detail paper

This is a very handy tool for process work, tutorials but especially useful for overlaying your drawings for development work. Although, it can be on the pricier side, it is well worth your money. There are various types some are yellow whilst the one I recommend is the White Tervakoski Roll. They come in various lengths but I stuck to the 30 cm x 100m roll which makes it easier to carry in your bag on your studio days. It is a great tool for the process work that you encounter on the proposal stages of your project. It comes in two sizes which makes it useful to use want to overlay larger drawings, however, if that is the case I would recommend simply using tracing paper as it is less prone to creasing. If you are familiar with tissue paper it has a resemblance as it is 25 gsm. The gsm (grams per square meter) determines what the paper thickness is best for, usually the lower the gsm, the more transparent the paper is and that is the case with the Tervakoski paper.
Detail paper and sketching paper tend to fall on similar categories but again, the gsm will help you decide what it is best for. For overlaying drawings like the working out stages of a maths question, don’t have to be super neat or refined. If you want paper for refined work, sticking to tracing paper is best because of how it stands against regular 100 to 150gsm paper. Since you’ll be figuring a lot more things out as they years go on, this is a staple tool that will help you along the way as you get better at understanding your own drawings.

The paper that comes covering the roll of detail paper
4. Scale rulers and set squares
Rulers come in all shapes and sizes, obviously. We’ve used them all, from calculating angles to drawing straight lines (although I have never managed to do that even with a ruler), basically this shouldn’t come as a surprise. What might be new is scale rulers and set squares. These are the rulers that you’ll be using for the rest of your life. Instead of figuring out the scale of Xcm, the ruler helps you out a little (I actually mean a lot…a lot.) when you need to draw something at a larger or smaller scale. Scale is just another way of measuring how big or small something is relative to its original (human scale) size which tends to be in mm in most cases. For example, 1:1 on a mm ruler is saying that 1mm is 1mm when you draw it, however if something is 1:100, on paper 1 mm is the equivalent to 100 mm.

The 15cm ruler that has lived in my pencil case since the visit we made in 1st year to see the opening of Walmer Yard
Essentially, the higher the second number is in the scale ratio, the smaller the information you are drawing is and the opposite goes for a lower second number. In other words, 1:5 construction detail on a A2 piece of paper is much larger scale than a 1:100 construction detail. I hope that made somewhat more sense about scale. Just imagine having to work that out each time you wanted to draw a detail (my brain would just not cope) and that is why a scale ruler is handy. I would suggest having both 15 cm scale rulers and 30 cm, as long as they have a variety of scales ranging from 1:1 to 1:1250. If you happen to find them as metal rulers, even better as they are great for model making too.
As for set squares, they are used for drawing objects at specific angles. The one I have, isn’t the greatest (I’ll refer you to some better examples down below), but what you want to look out for is a set square that allows you to easily fix and adjust to various angles. Otherwise you are better off with triangle rulers that have angles already set in place.
Drawing at various angles puts these drawing projections under certain categories. We call these Axonometric projections, they are as follows: Perspective (which you’ll have already come across if you are familiar with drawing), Isometric which is 30 degrees from the horizon line on each side and Axonometric which is 45 degrees from the horizon on each side. There are many more angles with various different names but these the ones you want to become familiar with as they appear as standard ways of showing your observations of space.

Finding a good set square does come at a cost, but the convenience of one will save you so much time and energy on your drawings, these types of projections take some time to master and having a good set square will only make things easier for you. This set square was useful for getting the various angles I needed, however, the screw became loose quite easily. Look out for the screw that it has to ensure you don’t lose the adjustment that secures your angles for drawing, with little trouble.
5. Rubbers (erasers) - but not just any kind

When drawing with pencils, you are bound to make mistakes, that is normal. What is even better is that there is so much choice on what erasers (also known as rubbers in the UK) you can use. The price range varies too, ranging from 25p to £10. But if like me, you had way too many rubbers and you wanted an eraser that didn’t erase everything on the page when you had made just a small mistake, you are better of with a different kind of eraser/rubber.
I came across two tubes that had similar mechanics to mechanical pencil with a broad end (Tombow Mono Zero Elastomer Eraser ) and a clutch pencil with a round end (the Pentel Clic Eraser Pencil). Although, they were higher in price range they were both very useful. They would fit into my pencil case like the rest of my pencils which was very practical. The only downside to both of these was that their refills had to be purchased separately, sometimes in different stores. Before I made any decisions, I checked into my local art stores to see what they actually looked and felt like. I would suggest you do the same. Because not all pencil styled erasers are created equal.
The Tombow Mono Zero Elastomer Eraser with the rectangular end turns out was a little smaller than the average mechanical pencil. It came in black and white (round and broad rubber ends too). This was definitely a handy tool have for technical hand drawings, even on the most layered drawings I was able to rub out any accidents or (in my case, because straight lines were never my thing) wobbly lines I would unintentionally make. With how handy it became, I was saddened by how quickly it ran out (but thankfully, I wasn’t in dire need of a refill as I’d stop doing technical drawings by hand.)

The Pentel Clic Retractable eraser came with a circular end, slighter larger to what you would typical find on the ends of a regular pencil. Now, this one was put to use for all kinds of drawings not just technical. It even replaced my older and regular cheap rubbers because of how easy it was to have in my pencil case. What was even better was how transparent it was, I could see when I was close to running out. I think the awareness of how much of the rubber was left made me a little more conscious of using it only when it was absolutely necessary. I bought a refill (as this doesn’t come with an extra one) online as I found it to be slightly cheaper. However, it almost cost me as much as buying a new one. It was more affordable than the Tombow one but I made use of both just as much.
To bear in mind for both these rubbers, is that it was more accessible and cheaper to find the right refills (or refills in bulk at a discounted price) online than it was in art stores. I bought the Tombow one in Cass Art on a Student Day, but sadly didn’t find square refills to buy them with at the time. As for the Pentel one, there was one version that they sold in store, but that I didn’t buy it because I was already testing out their older one when I purchased it much earlier on. It might even be better to have bought them all together, to see for yourself what is a best fit for your drawing tasks.
In other words, if you want to try these rubbers/erasers out for yourself I would advise that you buy them with a refill to save you the wait. They are were both great quality and were very convenient for all the drawings I had to do over the years. I still have them in my pencil case as both of the rubbers have become staples in my pencil case that I don’t go without anymore.
Unless there was sale, I would rarely buy in-store unless I wanted to check the tool first and see whether it was cheaper to buy online. I did however buy some of these items in store, especially during the Student Day at Cass Art last year (which I missed this year) .
Here are the links to the items I had personally bought and would recommend.
Mechanical Pencils: Zebra Drafix 0.3mm , Zebra Drafix Mechanical Pencil 0.5 or Zebra Drafix 0.3mm, 0.5mm, 0.7mm and 0.9mm set
Clutch pencils: Staedtler Mars Technico 788 C Pencil (this is the one I have but without the lead sharpener bit on the top) or the one with the lead sharpener bit + Lead refill for 2mm Clutch Pencil- HB
Sketchbooks
Detail paper: Tervakoski Detail Paper (25GSM 297mm x 100m)
Scale Rulers: Scale ruler 15cm + Scale ruler 30cm
Set Square: Adjustable Set Square
Erasers: Tombow Eraser Mono Zero Rectangular Shape Black + Refill, Pentel Clic Stick Eraser Rubber Holder - Blue Barrel + Clic White Refills + Pentel Clic Eraser Pencil style grip + Pentil ZER2 Clic Eraser Refill
A little disclaimer:
These are the items I’ve either bought or an alternative to what I would purchase and found very useful during my time at university. Unless otherwise stated above and in the links, these items are things I recommend to buy because I have found these to be useful for drawing, as an architecture student or otherwise.